Wednesday, December 14, 2016

Chrome OS exploit: one byte overflow and symlinks

The following article is an guest blog post from an external researcher (i.e. the author is not a Project Zero or Google researcher).

This post is about a Chrome OS exploit I reported to Chrome VRP in September. The Project Zero folks were nice to let me do a guest post about it, so here goes. The report includes a detailed writeup, so this post will have less detail.

1 byte overflow in a DNS library

In April I found a TCP port listening on localhost in Chrome OS. It was an HTTP proxy built into shill, the Chrome OS network manager. The proxy has now been removed as part of a fix, but its source can still be seen from an old revision: shill/http_proxy.cc. The code is simple and doesn’t seem to contain any obvious exploitable bugs, although it is very liberal in what it accepts as incoming HTTP. It calls into the c-ares library for resolving DNS. There was a possible one byte overflow in c-ares while building the DNS packet. Here is the vulnerable code, stripped heavily from its original to make the bug more visible:
It parses dot-separated labels and writes them into a buffer allocated by malloc(). Each label is prefixed by a length byte and separating dots are omitted. The buffer length calculation is essentially just a strlen(). A dot that follows a label accounts for the length byte. The last label may or may not end with a dot. If it doesn’t, then the buffer length is incremented in the first black box to account for the length byte of the last label.

Dots may be escaped though and an escaped dot is part of a label instead of being a separator. If the last label ends with “\.”, an escaped dot, then the first black box wrongly concludes that the length byte of the last label has already been accounted for. The buffer remains short by one byte and the least significant byte of dnsclass overflows. The value of dnsclass is most commonly a constant 1.

Exploit from JavaScript?

Shill runs as root. A direct exploit from JavaScript would accomplish in a single step what might otherwise take three: renderer code execution -> browser code execution -> privesc to root. This means less work and fewer points of failure. It’s convenient that shill and chrome are separate processes, so if the exploit fails and crashes shill, it doesn’t bring down chrome and shill is restarted automatically. The direct exploit turned out to be possible, but with difficulties.

There doesn’t seem to be an obvious way to get chrome to place “\.” at the end of a Host header using HTTP. So instead the exploit uses the TURN protocol with WebRTC. It encodes what looks like HTTP into the username field of TURN. TURN is a binary protocol and it can only be used because HTTP parsing by the proxy is lax.

Also, shill is listening on a random port. The exploit uses TURN again, to scan the localhost ports. It measures connection time to determine if a port was open. The scan also runs into a surprising behavior explained nicely in here. If the source and destination TCP ports of a localhost connection attempt happen to match, then the kernel connects the socket to itself. Anything sent on a socket is received on the same socket. This causes false positives, so the scan must retry until a single port remains.

A more difficult issue is that there aren’t any decent memory grooming primitives. The proxy allocates the headers into a vector of strings. It applies minimal processing to the Via and Host headers, forwards the headers to another server and frees the them. It accepts a single client at a time. The number of headers is limited to <= 0x7f, header size is <= 0x800 bytes and TURN packet is <= 0x8000 bytes. The rough plan is to do rooming over 6 connections or stages. The problem is that different stages need to reliably place allocations at the same location. This is difficult because the memory layout changes between connections in ways that are hard to predict. The solution is to create what I call a persistent size 0x820 byte hole.

820 hole

First, it should be mentioned that shill uses dlmalloc, which is a best-fit allocator. malloc() uses the smallest free chunk that can fit the request. free() coalesces any neighboring free chunks.

Let’s look at the picture of grooming at stage 1. This creates a persistent hole of 0x820 bytes:
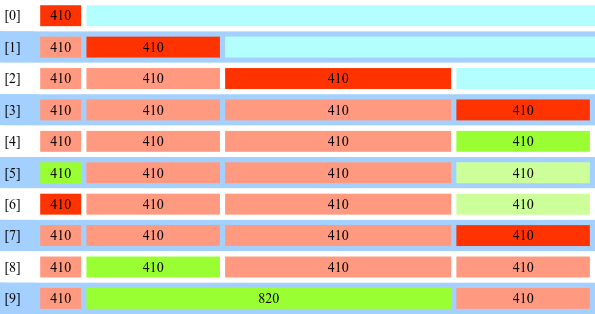
Red means that the chunk is in use chunk and green means free. Cyan is the large top chunk of dlmalloc. The number on each chunk is the chunk size in hex. 0x is omitted. In the rest of this post, I’ll always refer to chunk sizes in hex, omitting 0x. Also, I’ll often refer to chunk sizes as nouns, which is a short way of referring to the chunk with such size. I’ll omit the actual grooming primitives used for these allocations, but for those interested, the Host and Via header processing in here is used.

So the first picture shows how the 820 hole is created. Four chunks of size 410 are allocated from the top chunk in [0-3]. In [5,6], the first 410 is freed and replaced with the backing allocation of the vector of headers. Even though the headers themselves are freed after stage 1 connection closes, the backing allocation of the vector is persistent across connections. The fourth 410 is also freed and the buffer for incoming server data is placed into it. It is also persistent across stages. Then the connection closes, the two 410 headers in the middle are freed and consolidated into 820.

Why is this 820 hole useful? It is persistent because the previous and following 410 are not freed between stages. Each stage can now start with the steps:

  • allocate the 820
  • eat all free holes up to the top chunk by doing tons of small allocations
  • free the 820

Let’s say a stage then allocates a small chunk of 100. dlmalloc uses the smallest free chunk, which is the 820, because smaller ones were allocated. Now let’s say the stage finishes and the 100 is freed. Next stage can use the same algorithm to place a 100 at the same location. This capability allows just enough grooming in stage 2 and 3 to get from one byte overwrite to overlapping chunks.

But things could go wrong. There might be another 820 hole by chance and different stages might allocate a different 820. Or it could happen that the tons of small allocations fail to eat all holes, because the amount of memory allocated per connection is limited. So the exploit attempts to get rid of most of the free chunks before stage 1 by combining different techniques. An interesting one perhaps is that it intentionally crashes shill. The process is restarted automatically and starts with a clean heap layout. It also uses two techniques to allocate lots of memory—more than what’s allowed by the limits mentioned above. I won’t go into details here though.
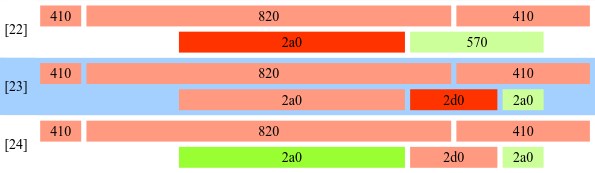
Overlapping chunks

Stage 2 triggers the memory corruption and stage 3 creates overlapping chunks:
First, a 1e0 chunk is allocated in [10-12] by allocating 640, then 1e0 and then freeing 640. Then the query buffer of ares is allocated into the 110 slot at [13]. This leaves a free 530 in the middle. Now is a good time to take a closer look at the dlmalloc chunk header declared here:
This header is kept in front of each chunk. The 3 least significant bits of the size field are used as flags. Most importantly, lsb = 1 indicates that the previous chunk is in use. So looking at [13], the 530 chunk has size = 531 and 1e0 chunk has prev_size = 530. The prev_size field is only used when the previous chunk is free. Otherwise the previous chunk spans the prev_size field. This means that the size field of 530 immediately follows the query buffer in 110. The single byte that overflows the query buffer overwrites the least significant byte of the size field of 530: 0x31 -> 0x01. So the three flags are not affected. But chunk size is corrupted from 530 to 500 as can be seen from [14].

What’s interesting is that 1e0 doesn’t know anything about this corruption and its prev_size remains 530. Now, [15-17] split the free 500 into free 2e0 and in-use 220. But dlmalloc is already confused at this point. When it tries to update the prev_size of the chunk following 220, it’s off by 30 bytes from 1e0. And 1e0 keeps on believing that prev_size = 530. It also believes that the previous chunk is free even though 220 is in-use. So now in [18], 1e0 is freed. It tries to coalesce with a previous 530 chunk. There is a 2e0, where there used to be 530. dlmalloc is fine with that and creates a large 710 chunk that overlaps the 220.

These kind of overlapping chunks are relatively easy to exploit. They’re good both for breaking ASLR and getting RCE. This technique for going from a single byte overflow to overlapping chunks is not new. Chris Evans demonstrated it here in 2014 as part of an investigation for this Project Zero post. I’m not sure if anyone has demonstrated earlier.

What’s not shown in the picture for simplicity is that [14-15] is the boundary between stage 2 and 3. The memory corruption of stage 2 occurs in DNS code after Via and Host headers are processed, so no further grooming is possible. Stage 3 continues with grooming to get overlapping chunks. But the 110 query buffer is actually freed after stage 2. Stage 3 needs to reallocate a 110 chunk at the same location. The method described above is used.

ASLR

Stage 4 breaks ASLR. It first turns the overlapping 220 into a more convenient 810 chunk:
So it allocates the 820, which overwrites the header of 220 and changes the size to 810. It’s interesting to note that the fd and bk pointers in the header of 220 are also overwritten. The exploit can’t afford to corrupt pointers at this point because it hasn’t broken ASLR. But fd and bk are only used when the chunk is free—they are used for a doubly linked freelist. [21] frees the overwritten chunk and dlmalloc finds it to be of size 810.

Next, two free 2a0 chunks are crafted into the 810:
So 2a0 is allocated, 2d0 is allocated and 2a0 is freed. Now, the recently mentioned fd and bk pointers are leaked to break ASLR. The two 2a0 chunks have the same size and are placed into the same freelist. With additional grooming at the beginning of stage 4, the exploit can be certain that the two chunks are the only ones in this freelist. Well, there is also a third element linked in—the freelist head allocated statically from libc. So looking at the first 2a0, its fd and bk point to the other 2a0 and into libc. Also, the first 2a0 overlaps with 820, which contains an HTTP header that is forwarded to an attacker-controlled HTTP proxy. So that leaks two pointers that the proxy server forwards to JavaScript. The two pointers are used to calculate the address of 820 and the base address of libc.

To root

ASLR defeated, stages 5 and 6 get code execution:
The rough idea is to overwrite a BindState which holds callback information—a function pointer and arguments. The function pointer is overwritten to point to system() in libc, the base address of which is known. And the first argument is overwritten to point to a shell command string crafted into the 820 slot, the address of which is also known. BindState chunk size is 40, so now, 810 is resized to 40. First, [25] frees 2d0, which consolidates to 810. For the 810 chunk to be placed into the size 40 freelist, it is removed from its current freelist by allocating it in [27]. 810 size is overwritten to 40 by freeing 820 in [26] and reallocating it with new data in [28]. [29] frees the resized 40 and [30] allocates a BindState into it. BindState now conveniently overlaps with 820. [31-32] reallocates 820 to corrupt the BindState to launch system(). The particular callback used triggers in 30 seconds and system() runs a shell command as root.

Persistence bug

It may sound surprising, but an attacker that has gained root on Chrome OS will lose the privileges after reboot. Chrome OS has verified boot. Bootloader in read-only memory verifies the kernel, which in turn verifies the hash of each disk block that it needs during runtime. This applies to the system partition which contains all the executable binaries, libraries and scripts. So an attacker can’t just set up a script to run at boot. But there is also a stateful partition that can be modified. It is intended for variable stuff like logs, configuration files and caches.

The way this exploit achieves persistence across reboots will sound familiar to anyone who’s read about this exploit by geohot. Both use symlinks, dump_vpd_log and modprobe. The dump_vpd_log script itself was fixed to not follow symlinks, but here is a snippet from /etc/init/ui-collect-machine-info.conf:
/var is a stateful partition so UI_MACHINE_INFO_FILE can be turned into an arbitrary symlink. dump_vpd_log --full --stdout writes /mnt/stateful_partition/unencrypted/cache/vpd/full-v2.txt to stdout. This can be used to create an arbitrary file with arbitrary contents during boot. geohot used dump_vpd_log to write a command into /proc/sys/kernel/modprobe at boot so a following modprobe would execute the command. But there are some extra problems when trying to reuse this approach.

The first issue is that /var/run is a symlink to /run, which is a tmpfs and not persistent. The exploit makes /var/run persistent by relinking it to /var/real_run. Some parts of Chrome OS get confused by that and it is dealt with by using more symlinks. I’ll skip the details here.

modprobe.d config file

So now it’s possible to write into arbitrary files during boot. Another issue is that writing into /proc/sys/kernel/modprobe with dump_vpd_log won’t work in this case, because the following udevadm writes into the same file and its output can’t be controlled. The last write() syscall is what counts when writing into /proc/sys/kernel/modprobe. So instead, the exploit creates /run/modprobe.d, which is is a configuration file for modprobe. Parsing of modprobe.d is lax. Any line starting with "install modulename command..." specifies a command to execute when that module is loaded. Any lines that fail to parse are ignored.

Late modprobe

The final problem is that ui-collect-machine-info.conf runs late during boot, when all modprobing is complete. The created configuration file is not of much use. So the final trick is to find a way to trigger modprobe late during boot. The exploit creates a device file with mknod, which has a major number 173. 173 is unknown to the kernel, which means that when something accesses the device file, then the kernel will attempt to modprobe a handler module named char-major-173-0. Then it is sufficient to turn some commonly accessed file into a symlink to the device file and each access to the file will modprobe. The exploit uses /var/lib/metrics/uma-event.

There is yet one more issue. Stateful partitions are mounted with the nodev flag, which blocks access to device files. So the device has to be moved to /dev during startup. This code in /etc/init/cryptohomed.conf is used for that:
The device is created as /mnt/stateful_partition/home/.shadow/attestation.epb and /mnt/stateful_partition/unencrypted/preserve/attestation.epb is turned into a symlink to /dev/net. This moves the device to /dev/net. /dev/net is used instead of /dev because cryptohomed changes the owner of the target attestation.epb. This would change the owner of the whole /dev directory and cause chrome to crash.

So that completes the Rube Goldberg machine of symlinks. dump_vpd_log creates /run/modprobe.d configuration file with a command to launch as root. cryptohomed moves a device file to /dev/net. Any generated metric accesses the uma-event symlink to the device, which launches modprobe, which launches a command from modprobe.d.

Patches


By now, the issues have been fixed pretty thoroughly. c-ares was patched in Chrome OS and upstream. The HTTP proxy was removed from shill. TURN implementation was hardened to block JavaScript from sending an arbitrary username to a localhost TCP port. And the symlink issues were fixed here, here, here and here.

Thursday, December 1, 2016

BitUnmap: Attacking Android Ashmem

Posted by Gal Beniamini, Project Zero

The law of leaky abstractions states that “all non-trivial abstractions, to some degree, are leaky”. In this blog post we’ll explore the ashmem shared memory interface provided by Android and see how false assumptions about its internal operation can result in security vulnerabilities affecting core system code.

We’ll walk through the process of discovering and exploiting a vulnerability resulting from this leaky abstraction, which will allow us to elevate our privileges from any Android application to a multitude of privileged contexts, including the highly-privileged “system_server”. This vulnerability has been present in the core Android platform code for the Marshmallow and Nougat versions. It has now been fixed in the recent Android bulletin. For a detailed disclosure timeline, see the “Timeline” section below.

One Device to Bind Them


As you know, Android applications can perform inter-process communication (for example, in order to communicate with various Android services), by using the Android binder. Initially, each Android service registers itself with a central daemon; the “service manager”. Subsequently, applications may contact the daemon in order to request “handles” with which the registered services may be contacted.

In keeping with good IPC design, the interface provided by binder itself is rather simplified. In fact, binder transactions are capped to a size of at-most 1MB. Well then, what about scenarios in which we need to transfer a large amount of data to a system service? For example, what if we want to modify the phone’s wallpaper? What about playing a media file? Surely we wouldn’t need to “re-invent” a mechanism through which memory can be shared in larger quantities between processes using binder transactions.

Indeed, there’s no need to worry. You see, binder transactions support the transfer of more than just binary data. In fact, binder transactions can be used to transfer file descriptors and even other binder handles. For instance, this is how the “service manager” is able to provide processes with handles through which they may communicate with the requested services.
Great, so we have a means of communicating with other processes - even in large volumes. But what about cases where we’d like to share (rather than simply transfer) large quantities of memory? Once again - no need to worry! For this purpose, Android has introduced a means of sharing memory, called “ashmem” (Android Shared Memory).

Sharing (memory) is Caring


So what exactly is ashmem? In short, each ashmem file descriptor acts as a handle to a shared memory region. The device also allows the user to perform several memory-sharing operations via a set of supported ioctls. These allow the user to set the size of the shared memory region referred to by the ashmem file descriptor, modify the name of the shared region and even control the protection mask with which this descriptor may be mmap-ed.

Let’s take a closer look at the actual implementation of the ashmem device, starting with the ioctl used to control the size of a shared memory region - ASHMEM_SET_SIZE:

static long ashmem_ioctl(struct file *file, unsigned int cmd, unsigned long arg)
{
   struct ashmem_area *asma = file->private_data;
   long ret = -ENOTTY;
   switch (cmd) {
       
     ...
   }
   return ret;
}

As we can see above, this ioctl simply allows the user to pass in any size. As long as the shared memory region has not been mapped yet, the device will happily record the passed-in size as the underlying size corresponding to the memory region. Not only that, but the recorded size can then be queried by the user by issuing the corresponding ioctl - ASHMEM_GET_SIZE.

So… this looks rather suspicious. What exactly does “setting the size” actually mean? Recall that ashmem regions are mapped-in by calling mmap, and, as we know, the mmap syscall receives an argument denoting the size of the mapping to be created.

This begs the question: what if the size of a created mapping does not match the size of an ashmem region? Perhaps the implementation of mmap will simply ignore the passed in size argument and use the size provided in ASHMEM_SET_SIZE? Perhaps, instead, the implementation of mmap will simply ignore the underlying size and use the size argument instead? There’s only one way to find out:

static int ashmem_mmap(struct file *file, struct vm_area_struct *vma)
{
   struct ashmem_area *asma = file->private_data;
    ...
   if (!asma->file) {
       ...
       vmfile = shmem_file_setup(name, asma->size, vma->vm_flags);
       ...
       asma->file = vmfile;
   }
   ...
   vma->vm_file = asma->file;
   mutex_unlock(&ashmem_mutex);
   return ret;
}

As we can see above, while the actual shared memory file is created using the size of the shared memory region (using “shmem_file_setup”), the memory mapping itself is created using the size in the virtual memory area (vma) - that is, the size passed in to mmap.

Let’s take a step back and reflect on this decision.

Essentially, this means that developers who attempt to use an ashmem region must take special care to always call mmap using the same size of the underlying shared memory region. Failing to do so will not return any visible error code to the developer, but will instead create a mapping with potentially dangerous consequences.

For starters, if a developer mmap-s a region with a size larger than the actual underlying region’s size, any attempt to access memory beyond the bounds of the underlying region will result in a illegal access, sending the SIGBUS signal to the process (which will then probably subsequently terminate).

But there’s another, more interesting, potential pitfall. What if the developer erroneously assumes that size of the underlying shared memory region and the mmap-ed size must be equal to one another? To try and answer this question, I’ve audited all instances of Android services which use ashmem to share memory with a user. From here on, we’ll focus on one such case - Bitmaps.

Mismatching Assumptions


As we mentioned earlier, one operation which requires the transfer of potentially large quantities of memory from one process to another is the exchange of images. For this purpose, Android exposes the Bitmap class, which can be easily serialized into a binder parcel.

As Bitmaps may be larger than the 1MB limit for binder transactions, the image’s data must be transferred via other means - such as ashmem. Indeed, for bitmaps above a certain size, this is exactly how this data is transferred. We can see that by looking at the “unflattening” function, “Bitmap_createFromParcel”:


   android::Parcel* p = android::parcelForJavaObject(env, parcel);
   const SkColorType colorType = (SkColorType)p->readInt32();
   const SkAlphaType alphaType = (SkAlphaType)p->readInt32();
   const int width = p->readInt32();
   const int height = p->readInt32();
   const int rowBytes = p->readInt32();
   …
   std::unique_ptr<SkBitmap> bitmap(new SkBitmap);
   if (!bitmap->setInfo(SkImageInfo::Make(width, height, colorType, alphaType), rowBytes)) {
       return NULL;
   }
   …
   …
}

First, the image’s metadata is extracted from the parcel and is used to construct an SkBitmap instance to hold this information. Next, the function proceeds to reads the actual bitmap’s data by calling Parcel::readBlob.

However, this looks potentially dangerous! First of all, note that the function uses the SkBitmap instance (i.e., the one holding all the metadata we read earlier on) in order to calculate the “size” of the resulting bitmap’s data. Then, it calls Parcel::readBlob in order to actually read the transferred data, while using the previously calculated size as an input argument.

Finally, let’s take a look at how Parcel::readBlob actually reads the enclosed Bitmap’s data:

   …
   int fd = readFileDescriptor();
   ...
   void* ptr = ::mmap(NULL, len,
                                   isMutable ? PROT_READ | PROT_WRITE : PROT_READ,
                                   MAP_SHARED, fd, 0);
   ...
   return NO_ERROR;
}

Aha! This is exactly what we were looking for. Instead of using the underlying size of the memory region, Parcel::readBlob performs an mmap operation using our own controlled length argument (i.e., the size computed from the bitmap’s metadata).

In and of itself, this is already a bad practice; the user could pass in an ashmem descriptor with any arbitrary size, resulting in an “invalid” memory mapping of the type we discussed earlier. This, in turn, would trigger a SIGBUS if the receiving application attempts to access the mmap-ed memory region.

But perhaps we can do better than just creating an invalid mapping? We’ve seen how the memory is mapped-in when creating a Bitmap, but how is it unmapped?

Well, after reading in the bitmap’s data, Bitmap_createFromParcel proceeds to store the information about the mapped data in the constructed Bitmap instance:

Bitmap::Bitmap(void* address, int fd,
                           const SkImageInfo& info, size_t rowBytes, SkColorTable* ctable)
                               : mPixelStorageType(PixelStorageType::Ashmem) {
   mPixelStorage.ashmem.address = address;
   mPixelStorage.ashmem.fd = fd;
   mPixelStorage.ashmem.size = ashmem_get_size_region(fd);
   mPixelRef.reset(new WrappedPixelRef(this, address, info, rowBytes, ctable));
   // Note: this will trigger a call to onStrongRefDestroyed(), but
   // we want the pixel ref to have a ref count of 0 at this point
   mPixelRef->unref();
}

However, instead of using the size of the previously created mapping, the constructor simply retrieves the size of the mapping using the ASHMEM_GET_SIZE ioctl (using the thin-wrapper ashmem_get_size_region). This is, once more, a false assumption - namely, that the underlying ashmem size and the size of the mmap-ed region must be equal to one another. Finally, once the bitmap is freed, the area is unmapped by calling:

void Bitmap::doFreePixels() {
   switch (mPixelStorageType) {
       ...
       case PixelStorageType::Ashmem:
           munmap(mPixelStorage.ashmem.address, mPixelStorage.ashmem.size);
           close(mPixelStorage.ashmem.fd);
           break;
       ...
   }
}

Putting it all together, this means that the mmap and the munmap calls are performed with potentially different length arguments, both of which are fully controllable by the attacker:

  • The length of the mmap operation is calculated from the bitmap’s metadata
  • The length of the munmap operation is calculated from the ashmem’s size

The mismatch between the mmap-ed and munmap-ed length provides us with a great exploitation primitive! Specifically, we could supply a short length for the mmap operation and a longer length for the munmap operation - thus resulting in deletion of an arbitrarily large range of virtual memory following our bitmap object. Moreover, there’s no need for the deleted range to contain one continuous memory mapping, since the range supplied in munmap simply ignores unmapped pages.

Once we delete a range of memory, we can then attempt to “re-capture” that memory region with controlled data, by causing another allocation in the remote process. By doing so, we can forcibly “free” a data structure and replace its contents with our own chosen data -- effectively forcing a use-after-free condition.

From here on, we’ll refer to these crafted bitmaps with mismatching lengths as “BitUnmap”s.

Thinking of an Exploit Strategy

Finding a Target Service


Okay - now that we finally have a good exploitation primitive, how can we use it in order to write a stable exploit that will allow us to gain code execution in system_server? First of all, we’ll need to find a binder call in system_server which un-flattens a Bitmap object (or unparcels a Bundle containing a Bitmap) from a binder transaction. Moreover, it would be advantageous if we were able to access this call from any context, requiring no permissions.

Luckily, system_server houses many different binder services, increasing the odds of finding a comfortably exploitable endpoint.

One such candidate is the “notification” service, which provides an interface for interaction with the notification bar. Among the operations supported by this service, any application (even those running in the isolated_app SELinux context and those requiring no permissions whatsoever) may attempt to add a notification object which is then handled by the notification service. Moreover, Notification objects are complex, and may contain images (bitmaps) along with the presented text.
Using notifications is also advantageous for a completely different reason - their lifetime is controlled by the attacker. Remember that after we free a memory range in the remote process, we’d like to re-capture that memory region with our own controlled data. Well, as we’ve already seen, Bitmap objects are mmap-ed into the remote address-space, and contain completely controlled data. What’s more, once a notification is added to the notification bar, the Notification object will remain referenced in the remote process (until the notification is removed). This effectively means we can use notifications for a dual purpose:

  • Sending crafted BitUnmaps to delete memory ranges in the remote process
  • Sending regular Bitmaps with controlled data in order to reclaim freed regions

Finding a Target Data Structure


After we’ve established our ability to unmap arbitrarily large memory regions in system_server by crafting our own Notification objects containing BitUnmap instances, we still need to think of a method with which we’ll be able to reliably hijack control flow in system_server. That is, we need to decide which data structure to unmap using our primitive.

First, consider the fact that our BitUnmap objects are allocated by calling mmap. Due to the behaviour of mmap, they will simply inhabit the highest memory address between mm->mmap_base and TASK_SIZE which contains a sufficiently large contiguous hole. This means that, for example, attacking single C++ or Java objects would be rather difficult, as they are located in the heap and are surrounded by other data structures which we would have to “repair”.

Moreover, even if we were able to hijack such data structures, we would still need to craft their content in a way which would allow us to eventually hijack the control flow. For example, exploiting use-after-free vulnerabilities in C++ objects normally includes hijacking their vtable and replacing it with a structure pointing to other executable memory locations. With modern exploit mitigation techniques, the amount of steps required to bypass XN-bit protection and ASLR could be quite substantial.

Perhaps there’s a cleaner way to get code execution?

Optimally, we’re looking to replace a data structure that has the following properties:

  • Is allocated directly using mmap (i.e., not “on the heap”)
    • Therefore we don’t need to “repair” adjacent data structures
  • Allows direct control over code execution
    • Saves us the need to craft a complex chain to bypass mitigation techniques
  • Does not require address-space dependant information unique to system_server
    • Saves us the need to find (or create) an information leak to bypass ASLR

In order to find this magical structure, I’ve written a small gdb script to monitor and log all calls to mmap coupled with their origins and sizes. This helped me group the “families” of mmap-ed objects which could be useful for exploitation. After producing the list, one such candidate stood out as having all the above properties - Threads.

Hanging by a Thread


As we know, all threads in the same process share the same address space. Moreover, system_server, being the large process that it is, contains many code paths which handle long-running or periodic tasks. Naturally, these code paths are handled by creating additional threads in system_server. When threads are created, they require two data structures which are unique to each thread: the thread metadata (pthread_internal_t) and the thread’s stack.

Looking at the code in Android’s bionic, we can see that these two regions are, in fact, carved from the same memory region, which is allocated using mmap:

                                              pthread_internal_t** threadp,
                                              void** child_stack) {
   if (attr->stack_base == NULL) {
       // The caller didn't provide a stack, so allocate one.
       // Make sure the stack size and guard size are multiples of PAGE_SIZE.
       mmap_size = BIONIC_ALIGN(attr->stack_size + sizeof(pthread_internal_t),    
                                                        PAGE_SIZE);
       attr->guard_size = BIONIC_ALIGN(attr->guard_size, PAGE_SIZE);
       //Calls mmap to create the mapped space, and mprotect to create a guard page
       attr->stack_base = __create_thread_mapped_space(mmap_size, attr->guard_size);
       …
       stack_top = reinterpret_cast<uint8_t*>(attr->stack_base) + mmap_size;
       …
   }
   ...
   pthread_internal_t* thread = reinterpret_cast<pthread_internal_t*>(stack_top);
   ...
}

So, if we are able to deallocate a thread’s stack and immediately reclaim it as our own, we should be able to directly achieve code execution simply by virtue of already having prepared a stack which performs whichever operation we’d like to execute within system_server.

Regardless, before we can start scheming about hijacking a thread, we need to think of a way to spawn a thread in system_server on-demand.

Going through the available binder calls terminating in system_server reveals one such comfortably accessible code-path: AudioService::loadSoundEffects. This binder command can be called without requiring any permissions, and causes the AudioService to load a predefined set of sound effects in its internal “sound pool”. Creating such a pool causes system_server to spawn several threads:
In this exploit we’ll hijack the “SoundPoolThread”, for a variety of reasons:

  1. It is the first thread created when creating a new sound pool. This fact will come in handy later, when we try and force it to be allocated in a controlled memory region.
  2. After initializing a sound pool, the “SoundPoolThread” awaits further commands by waiting on a condition variable. Until the condition variable is signaled, the “futex” system-call will not return. As the thread will not access its stack while it is waiting for the system-call to return, this allows us to replace the thread’s stack with our own, leaving the thread none the wiser. Once we’ve performed our switch, we can trigger a chain of events (such as closing the sound pool by calling unloadSoundEffects) which will signal the condition variable and cause the system-call to return.
  3. Once the sound pool is closed, the SoundPoolThread is no longer needed and simply terminates anyway. This means we can safely hijack it without causing any adverse effects in system_server.

A Short ROP Chain


Once we hijack the SoundPoolThread’s stack, we’ll need to replace it with our own ROP stack. So, what should we run there? Well, for versions of Android prior to 7.0, we could simply write a short ROP chain which mmap-s one of our ashmem file descriptors with executable access-permissions, and then jumps directly to it. Indeed, this would allow us to simply place executable code at the base of an ashmem descriptor and send it along to system_server.

However, as of Android 7.0, this solution would no longer work. This is because starting from Android 7.0, a new set of mitigations have begun to roll out which aim to prevent unauthorised code execution within system_server (and other privileged processes). A small subset of these rules can be seen here:

# system_server should never use JIT functionality
neverallow system_server self:process execmem;
neverallow system_server ashmem_device:chr_file execute;
neverallow system_server system_server_tmpfs:file execute;

Specifically, the second rule prevents ashmem file descriptors from being mapped as executable within system_server. Moreover, the use of execmem (in the first rule) prevents system_server from mapping “new” executable memory regions within the process.

So… we could still write a large ROP chain to perform whichever set of commands we’d like within system_server. Due to the breadth of system_server, the ROP gadgets could conceivably even be turing-complete. However, this seems incredibly complex to do manually, and quite time consuming to automate.

Instead, we could look for a way to directly bypass the mitigation mentioned above. We’ll do so by looking for SELinux contexts which can be executed within system_server. After a short search, we stumble upon the following SELinux rule:

# system_server should never execute anything from /data except for /data/dalvik-cache files.
neverallow system_server {
   data_file_type
   -dalvikcache_data_file #mapping with PROT_EXEC
}:file no_x_file_perms;

Okay, so files with the SELinux context dalvikcache_data_file may be freely mapped as executable. This makes sense as when Android applications are installed they go through an “optimization” process, resulting in new files which may be executed more quickly. As system_server loads many of these optimized files, it needs to be able to map them in as executable to use them.

While system_server may use these files, it cannot directly create them. In fact, the only process which is allowed to create files with these contexts is installd - the installer daemon.

The distinction, however, is purely semantic. This is due to the fact that system_server can directly issue commands to installd using a special socket. One such command can be issued to cause installd to start such an optimization process (resulting in a file with the dalvikcache_data_file context) from any chosen file and to any chosen destination. Thus, all our ROP chain would need to do is to open the installd socket, issue this command to create our wanted executable chunk, and finally map that new file as executable.

We could even go one step further - since we are launching our attack from an Android application, we could simply embed the executable shellcode within the source code of our application (for example, within a static byte array). Once our application is installed, it will be optimized, resulting in a new file of type dalvikcache_data_file). As luck would have it, this optimization process does not garble static byte arrays, meaning our shellcode will now reside in this new executable file. Finally, all we need to do is to simply locate this optimised file on the disk and map it in as executable.
Lastly, when crafting our ROP stack we’ll need to know where to start writing the gadgets relative to the stack’s base address. That is, we need to know the accurate position in the stack at which the stack pointer will be placed when the SoundPoolThread enters the command loop.

Luckily, we can avoid the need to “guess” the top of the stack (and place a ROP-slide) by using additional trick; we can simply start up such a thread in our own process (by creating a sound pool object), and wait for it to enter the command loop. Once the thread settles, we can read the /proc/$pid/stat for that task and measure the value of the “SP” token against the base address of the stack for that thread.

Bypassing the need to Bypass ASLR


Up to now we’ve been avoiding the question of ASLR. This has been no mistake, but rather a happy accident. In order to allow for fast application startup times, Android applications are forked from a single process, appropriately named zygote. This process preloads many commonly used shared libraries and resources, thus saving applications the need to do so on their own when they are launched.

Among the processes forked from zygote is our target for exploitation - system_server.

This essentially means that the portion of our address space which are inherited from zygote are shared with system_server, including a multitude of shared libraries which are available at our disposal.

As such, once we manage to hijack a running thread, we can create an entire valid ROP stack using gadget addresses located in our own address space (so long as we stick only to zygote-loaded shared libraries). Doing so allows us to ignore ASLR for the purpose of this exploit, as all the other stages of the exploit are address-independent anyway.

Shaping the Address Space


Lastly, before we can put together a complete exploit, we still lack the ability to shape the remote address space. Specifically, we need to reach a state that will cause the targeted objects that we would like to delete to be placed in controlled memory regions, which could then be freed and subsequently reclaimed.

Recall that the behaviour of mmap dictates that for every allocation, the chosen memory address will always be the highest address in the range of mm->mmap_base to TASK_SIZE which contains a sufficiently large contiguous unmapped region.

This makes mmap an optimal allocator to use when attempting to shape the address space - most other allocators require special conditions in order to revert to contiguous allocations.

In our case, we already know that we would like to replace the memory region reserved for a thread’s stack. We’ll denote the size of this region by “thread_size”.

First, we’ll send over a large amount of notification objects to the remote service, each of which containing a bitmap of size thread_size. This will allow us to fill in any “holes” in the remote address space which may have been opened up during the lifetime of system_server. After doing so, we are guaranteed that any subsequent allocation of size thread_size will be contiguous and placed at the top of the current mmap-ed region.
Next, we allocate many consecutive bitmap objects of size thread_size, each of which referenced by a single Notification object. After doing so, we intentionally remove a single notification from the consecutively allocated set. Then, we proceed bombard the system_server process with many small binder transactions triggering a remote garbage collection to occur. This, in turn, frees up the space previously held by the bitmap object in the removed notification, creating a thread_size sized hole, like so:
Now, we can re-load the audio effects, causing the SoundPoolThread to be spawned in system_server. As this is a thread_size-d allocation and all previous holes of that size have already been filled (by our bitmap objects), it will have to populate the vacant hole that we just created amidst our chunk of contiguous bitmaps.

Now, we can remove the notification directly in front of the SoundPoolThread’s stack and once again trigger a remote garbage collection. This will cause another hole to open up, bringing us to the following state:
Once we’ve strategically opened up a hole in front of the SoundPoolThread, we can send our crafted BitUnmap object. We’ll create it so that its metadata size (i.e., the size used in the mmap) will be equal to thread_size. However, the size of the ashmem descriptor will actually be twice that size! This means the once our BitUnmap is freed in the remote process, it will unmap itself, along with the SoundPoolThread.
Finally, now that we’ve freed up the SoundPoolThread’s stack, we can send one more notification - this time of size 2*thread_size, which will fill in the last created hole, effectively replacing both the region held by the BitUnmap, and the region containing the SoundPoolThread’s stack.

Putting it All Together


At long last, we have all the steps needed to create a complete working exploit. Here’s a short run-down of all the steps we discussed, which allow us to hijack a thread within the system_server process using our own crafted ROP stack:

  1. Build a ROP stack using gadgets in zygote-originating shared libraries
  2. Unload all sound effects (closing the current SoundPoolThread, if present)
  3. Allocate many bitmaps of size thread_size to force consecutive allocations
  4. Open up a hole in the middle of the consecutively allocated bitmaps
  5. Reload the sound effects to create a new SoundPoolThread within the created hole
  6. Open up a new hole directly in front of the previous hole
  7. Send a BitUnmap object to fit in the newly created hole
  8. Force a remote GC to cause the BitUnmap to free itself and the SoundPoolThread
  9. Allocate a new bitmap to occupy the space previously held by the SoundPoolThread
  10. Unload all sound effects - causing the condition variable to be signalled, thereby triggering the SoundPoolThread to start executing using our own crafted stack!

Afterword


Although this blog post is quite lengthy, there are many smaller details that I neglected to mention here (in favour of some brevity). I’d encourage anyone who’s interested to dig into the full source code of the exploit to discover any such “missing” pieces.

Along with the source code for the exploit itself, I’m also releasing a project which can be used to easily create shellcode for use in the exploit itself. Specifically, this project contains a small assembly stub which fixed up the freed pthread_internal_t structure at the top of the stack and corrects the thread-local storage AARCH64 registers to point to their new location. After performing the needed fixups, it simply jumps to the shellcode’s main function.

In order to allow for easy shellcode creation in a high-level language (such as C) rather than hand-coding it all in assembly, the shellcode wrapper uses a custom linker script to prepend the small fixup stub to the shellcode, and compiles the shellcode itself as position independent.

You can find the source code for the shellcoder here.

Timeline


  • 07.09.2016 - Vulnerability reported
  • 07.09.2016 - Initial response from Android security, assigned Android-ID
  • 23.09.2016 - Exploit submitted to Android security
  • 26.09.2016 - Android notify that the fix will be present in the next partner bulletin
  • 27.09.2016 - CVE-2016-6707 assigned
  • 01.11.2016 - Vulnerability fixed and released in the November bulletin